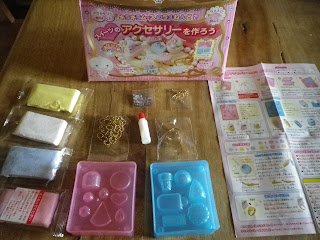
Whilst in England I was very excited to receive these three Japanese craft kits in the mail. They are all from Kutsuwa, and the idea behind them is that you use fuwa-fuwa clay to create decorations and jewellery. I opened the first kit today and made it in about 4 hours. It was so much fun!
This is what came inside the box: 4 colours of clay, some moulds, ring backs and necklace chains, jewellery hooks, glue, and sparkles. Also an instruction sheet in Japanese, which my husband helped me to read. All you really need to know: after making them let them dry for two days, and when inserting the hooks, put glue on the hook first.
The kit also required a toothpick (I used a kebab stick) and some vegetable oil to stop the clay from sticking to the mould.It was pretty easy: I am sure an older child could do it, like a ten year old. I spent a long time making sure all of them came out looking perfect: the clay is soft, so you can roll it up and try again if it doesn't look beautiful.
After the charms were made I added the hooks and the sparkles. There's a few without hooks: those ones will become rings. In total the kit made 18 mini ice creams/ cakes, which is more than it shows on the box, and pretty much enough to make everything twice.
Now I have to wait two days before transforming them into jewellery: I'll post pictures of the finished necklaces and rings! The next Kutsuwa Clay Kit I make will be the Donut Accessories kit. It really is a great way to spend a rainy afternoon!


2 comments:
These kits are super ridiculously cute, I can't even believe it. I was wondering if maybe you still had the instructions laying around and could maybe take a decentish picture of them? My niece would probably be way into this stuff and I want to make sure I'd be able to read everything well enough to help her out if anything came up.
I'll totally understand if you've thrown them away or just plain don't feel like it. Either way, thanks!
Hi Snail!
I didn't read the instructions (they are in Japanese!) They have some pictures but I'm pretty sure you could figure it out even without the pics. I mostly looked at the picture on the front of the box as a guide for how they should turn out. It's very easy, like play-doh! Have fun with your niece <3
Post a Comment